Website powered by

Bicycle - Part 5 -Final Tweaks/Renders

General / 09 February 2019

Here are the final renders taken in Marmoset Toolbag. I will not be returning to this project as I've been chipping away at it too long and need this chapter to close, as I've waffled on about in previous posts. Any feedback is welcome still! Would love to know where people think I could approve.


Wicker material also rendered in Marmoset Toolbag, made 100% in Substance Designer


Bicycle - Part 4 - Texturing

General / 26 January 2019

It's been a long time since I've updated this blog as I haven't put as much time in as I should have but I want to follow this blog through to finish. This disjointed project however is nearly over and I can plan my next one properly.

I popped the model into Marmoset Toolbag and did a base pass for the bicycle frame and just block colours for the handle, seats and basket.

After leaving it a while I thought the paint colour wasn't bold enough so upped the saturation and made it slightly darker, with a tint of green. This colour works well with the brown wicker and leather seat though I am unsure whether it is now too bold so may alter the colour again. The mud on the wheels wasn't great and was also too much so I removed that and may add some dirt and scratches once I am happy with the main materials.

The above image is the bicycle in it's current state. It is near completion even though there is lots that could be improved. I have found that working on this 2-3 times a month means I am not very invested in the project and the quality has decreased so that is something I will work on for future projects. Texturing is also the most challenging aspect for me so I will spend more time creating and experimenting with materials to increase my confidence in this aspect of the pipeline.

I made a few attempts at the wicker pattern as I'm rusty with Substance Designer and was unsure how to approach the weave. After some feedback from friend I found a simple blend of nodes that got the result I want and are easily adjusted so I have continued working on this file. Below is my first pass and my current wicker material after feedback. The main feedback I received was the wicker grain needed more detail and colour variation and that the weave proportions needed tweaking. By increasing the size of the vertical weave as suggested it did make the material more visually appealing. I added more fine details to the grain and blended more colours in and a slight gradient. 


 I'm happy with how my material is looking and the progress of my bike. I have more motivation to continue now as I am so close to closing this project and noting areas to improve. Any further feedback would be greatly appreciated and a big thanks to everyone who has helped me so far.

Bicycle -Part 3 - UV Unwrapping

General / 07 October 2018

Sorry to anyone who has been following my blog, life has got busy but exciting at the moment so I have had less time for this project. Now I am more on track I hope to finish the project and have it uploaded within the month.


I unwrapped the model in Maya using the standard tools provided. After each part I unwrapped, hardened the UV shell perimeters and softened the remaining edges. The new tools in the UV tool kit have really helped me get a good unwrap in no time, particularly the texel density 'get' and 'set' and the rotation settings. I decided to manually pack the shells once I had unwrapped everything, however I am sure I could packed them tighter to reduce the wasted texture space.

I have chosen to bake the handle bars and seat separately, and keep the basket unwrapped separately too as I will make a seamless texture in Substance Designer.

The bake was done in Substance Painter. I exploded the mesh by moving aspects by a relative snap so I could easily snap these pieces back to their original place and ensure the high and low poly overlapped properly. Once all part of the bike were 'exploded' I duplicated the mesh and used the 'transform tool to expand the mesh to encase the original low poly model. I applied a translucent Lambert so I could see how it was encasing both the low and high poly, and manually moved some verts where the transform didn't quite cover everything.

I had to make some alterations after the first bake, however it wasn't long before I decided it was ready for textures. There are a few marks that could do with more attention, however I have decided I need to move forward as I want to improve my texturing. I have swapped out the exploded mesh for the original and the bake has transferred smoothly as expected. In my free evenings I will texture the bicycle and create the seamless wicker material for the basket. I will post the bake on the handle bars and seat alongside the first texture pass when they are complete.

Bicycle - Part 2 - Modelling

Work In Progress / 18 August 2018

Hello!

This is my 2nd post, a follow up on my Bicycle 3D model I am working on. The last couple of weeks I have been unable to work on this project due to other commitments unfortunately. I have collectively worked around 8 disjointed hours of the 14 days, so as you can image not lots has be accomplished! I hope I get more free time in the coming weeks so I can show more progress, however in the meantime I will still update every two weeks and I will have something to show!

For these 2 weeks I have been optimizing the model ready to then be unwrapped and baked. I have almost completed this transition, however I have shot myself in the foot a little when I created the high poly model so optimizing is taking longer than I know it should. It's my mistake, and I know it is due to not following and updating my plan as I usually do, because this was a project after university and I spent a lot of scattered hours on it (like I still do now until I am settled with work/life). These scattered hours meant I lost the flow and I could've modeled more efficiently in some areas to save myself time now. Not to worry as I will put the extra couple of hours in to complete it and this has stressed again the importance of planning and sticking to it and updating as the project progressed.


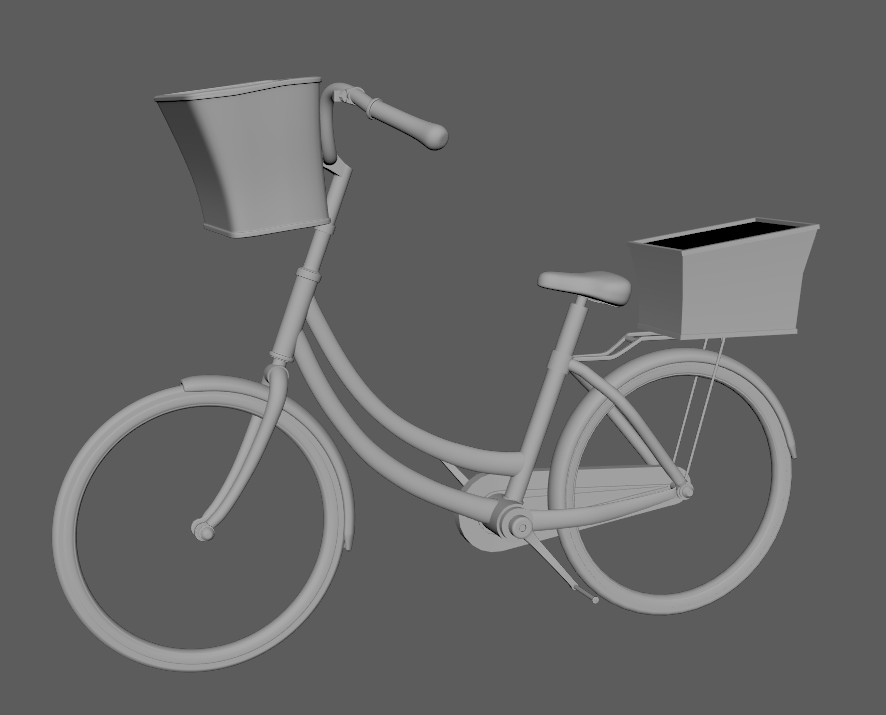
These screenshots are of the models wire frame so far. The common shapes use are cylindrical which can help me lower the poly count as smoothing edges will still make it look good, however when the edges are visible at end of a cylinder it can look really clunky. I've left a reasonable amount in as I can optimize it further at the end if I want, but I want this model to look smooth as it will be a center piece. 

The basket is one sides as I plan to make a seamless wicker material and set it double sided in UE4.

Some small details I have yet to get to!

The main points I've learnt these past weeks are:

- Have a thorough plan with a rough timeline and always address this at the start of any session.

- Update that time plan as life progresses to the flow continues and the whole process is as efficient as possible.

- Small chunks of work may not flow and progress may feel stinted, but perseverance is key. 

In the next post I'm positive there will be better wire frames shots of the completed low poly and I will definitely be unwrapping straight afterwards. If you have any feedback, particularly areas you think I could cut the geometry further let me know! I find creating a low poly challenging as projecting the high poly only does details so I need to keep a solid silhouette and I'm always hesitant to remove too much geometry.

Bicycle - Part 1 - Modelling

Work In Progress / 05 August 2018

Hello, 

Welcome to my first blog! The aim of this blog is to keep anyone who is interested updated on my current projects, and show more about my process. I have planned for a while to add more to populate my storefronts environment and also want to amend it according to feedback I have received, but other commitments have hindered this slightly in recent months. I HAVE however started creating a bicycle, which I will present in my storefronts scene. This will kick start my work back on this project. So here is what I have got so far, and I will update everyone 1-2- weeks on my progress.


This is an early Maya screenshot of my bicycle. I started this during my demonstration sessions at Norwich Gaming Festival and have continued working on this in short bursts when I have the time. I used 2 reference images, one for the overall design and style, and one for the up close details as it was a clearer resolution. For the seat, handles and spokes I did look at other images for reference too.

Main reference:

I solely used Maya for the main bike structures, and ZBrush for the more organic aspects of the model. I have chosen an old leather style seat and matching handlebar grips as I feel this will be a nice material break up and suit the colours and style of my storefronts scene. I blocked these out for size in Maya and imported them to ZBrush to sculpt. Using the stitch brush and my own alpha I created the thick thread that attaches the leather material. This will be projected onto a lower poly model and baked in Substance or Marmoset later down the line. Once done, I have decimated these models so they maintain their shape but can run easily in Maya. From there I will quad draw over them and get the low poly mesh.

Unfortunately I have not recorded my hours on this aspect of the process as it has been so scattered about the last few months. Now I plan to have longer sessions I will hopefully be able to estimate the time taken for each process. At this stage I have completed the model and have started creating the lower poly version of all aspects. Here is the high poly rendered out in Marmoset Toolbag 3 (handles and seat are lower poly versions):

I plan to get the low poly model done and unwrapped over the next 2 weeks in my spare time, and I endeavor to keep this blog up to date. 

Any feedback or suggestions are always welcome!